0.0.1 health_check :健康状态检查
- 示例,匹配子串是否满足要求:
http {
    server {
    ...
        location / {
            proxy_pass http://backend;
            health_check match=welcome;
        }
    }

    match welcome {
        status 200;
        header Content-Type = text/html;
        body ~ "Welcome to nginx!";
    }
}0.0.2. nginx_http_headers模块:
add_header用来返回指定内嵌变量,自定义响应头部
比如:
add_header X-Via $server_addr        ##返回nginx代理IP
add_header X_Cache $upstream_cache_status ##返回缓存状态upstream内嵌变量: http://nginx.org/en/docs/http/ngx_http_upstream_module.html#variables
- 示例一,返回
nginx代理服务器(node1)内网IP
node1节点的default.conf如下配置:
server {
    listen       80;
    server_name  localhost;
    add_header X-Via $server_addr;    ##X-Via为自定义的名字,可以随便取

...
}重启Nginx,客户端执行请求:
[root@server ~]# curl -I node1.shellscript.cn
HTTP/1.1 200 OK
Server: nginx/1.16.0
Date: Sun, 16 Jun 2019 02:46:09 GMT
Content-Type: text/html
Content-Length: 612
Last-Modified: Tue, 23 Apr 2019 14:36:12 GMT
Connection: keep-alive
ETag: "5cbf22dc-264"
X-Via: 172.30.0.12
Accept-Ranges: bytes

[root@server ~]#- 示例二,返回
upstream缓存状态
编辑default.conf:
server {
    listen       80;
    server_name  localhost;
    add_header X-Via $server_addr;
    add_header X-chache $upstream_cache_status;
    #charset koi8-r;
    #access_log  /var/log/nginx/host.access.log  main;

    location / {
        root   /usr/share/nginx/html;
        index  index.html index.htm;
    #proxy_pass https://www.osjapan.net/;
    }
    location /forum/ {
    proxy_cache mycache;
    proxy_cache_valid  200  1d;
    proxy_cache_valid  301 302 10m;
    proxy_cache_valid  any 1m;
    proxy_cache_use_stale error timeout http_500 http_502 http_503 http_504;
    proxy_pass http://upservers/;
    proxy_set_header Host $host;
    proxy_set_header X-Real-IP $remote_addr;
}
    location ~* \.(jpg|png|gif)$ {
    proxy_cache mycache;
    proxy_pass http://upservers;
    proxy_set_header X-Real-IP $remote_addr;
}可见在/forum路径下设置了缓存
注意:没有设置缓存功能的路径不会返回缓存状态$upstream_cache_status
重启nginx,客户端请求:
[root@server ~]# curl -I http://node1.shellscript.cn/forum/
HTTP/1.1 200 OK
Server: nginx/1.16.0
Date: Sun, 16 Jun 2019 03:05:33 GMT
Content-Type: text/html; charset=UTF-8
Content-Length: 14
Connection: keep-alive
Last-Modified: Fri, 14 Jun 2019 09:23:28 GMT
ETag: "e-58b45330b86e8"
X-Via: 172.30.0.12
X-chache: MISS
Accept-Ranges: bytes

[root@server ~]# curl -I http://node1.shellscript.cn/forum/
HTTP/1.1 200 OK
Server: nginx/1.16.0
Date: Sun, 16 Jun 2019 03:05:37 GMT
Content-Type: text/html; charset=UTF-8
Content-Length: 14
Connection: keep-alive
Last-Modified: Fri, 14 Jun 2019 09:23:28 GMT
ETag: "e-58b45330b86e8"
X-Via: 172.30.0.12
X-chache: HIT
Accept-Ranges: bytes

[root@server ~]#第一次请求没有缓存,所以状态为MISS,第二次请求则使用缓存,状态为HIT
0.0.3. fastcgi模块
让nginx支持动态文件解析
在node1节点上,安装php-fpm:
[root@server ~]# yum install php-fpm -y
[root@server ~]# rpm -ql php-fpm
/etc/logrotate.d/php-fpm
/etc/php-fpm.conf    ##主配置文件
/etc/php-fpm.d
/etc/php-fpm.d/www.conf   ##注意里面的user/group指定是否和nginx.conf一致
/etc/rc.d/init.d/php-fpm
/etc/sysconfig/php-fpm
/usr/sbin/php-fpm
/usr/share/doc/php-fpm-5.3.3
/usr/share/doc/php-fpm-5.3.3/LICENSE
/usr/share/doc/php-fpm-5.3.3/php-fpm.conf.default
/usr/share/fpm/status.html
/usr/share/man/man8/php-fpm.8.gz
/var/log/php-fpm
/var/run/php-fpm
[root@server ~]#启动php-fpm:
[root@server ~]# service php-fpm start
Starting php-fpm:                                          [  OK  ]
[root@server ~]# ss -tnl
State      Recv-Q Send-Q                  Local Address:Port                    Peer Address:Port
LISTEN     0      128                                :::10050                             :::*
LISTEN     0      128                                 *:10050                              *:*
LISTEN     0      128                         127.0.0.1:9000                               *:*
LISTEN     0      50                                  *:3306                               *:*
LISTEN     0      7                                   *:3690                               *:*
LISTEN     0      128                                 *:80                                 *:*
LISTEN     0      32                                  *:21                                 *:*
LISTEN     0      128                                 *:22                                 *:*
[root@server ~]# 编辑nginx的default.conf:
location / {
        root   /usr/share/nginx/html;
        index  index.php index.html index.htm;   ##加上index.php
    }

####把下面的locatio注释去掉,让nginx支持php-fpm(匹配以php结尾的请求,发送给后端的fastcgi服务器)
location ~ \.php$ {
        root   /usr/share/nginx/html;        #把这里改成web根路径
        fastcgi_pass   127.0.0.1:9000;
        fastcgi_index  index.php;
        fastcgi_param  SCRIPT_FILENAME  /scripts$fastcgi_script_name;
        include        fastcgi_params;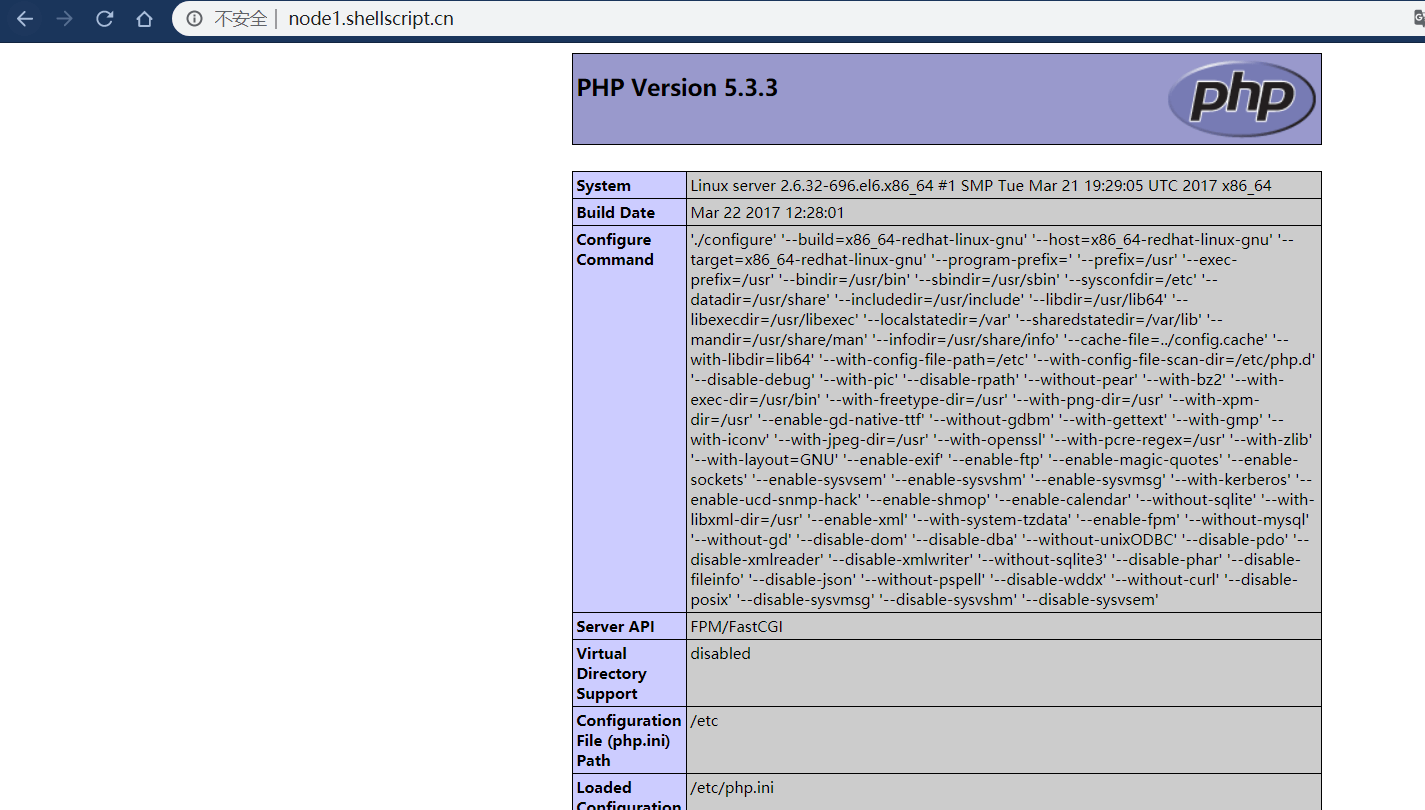
}写一个php版本检测的文件:
[root@server nginx]# cd /usr/share/nginx/html
[root@server html]# mv index.html nginx.html
[root@server html]# vim index.php
<?php>
    phpinfo();
?>
[root@server html]#重启nginx:
service nginx reload客户端请求:

这个原因主要是由于安装php-fpm生成的/etc/nginx/fastcgi_params默认文件内容不适应当前环境导致的
修改为如下内容:
fastcgi_param  GATEWAY_INTERFACE   CGI/1.1;
fastcgi_param  SERVER_SOFTWARE     nginx;
fastcgi_param  QUERY_STRING        $query_string;
fastcgi_param  REQUEST_METHOD      $request_method;
fastcgi_param  CONTENT_TYPE        $content_type;
fastcgi_param  CONTENT_LENGTH      $content_length;
fastcgi_param  SCRIPT_FILENAME     $document_root$fastcgi_script_name;
fastcgi_param  SCRIPT_NAME         $fastcgi_script_name;
fastcgi_param  REQUEST_URI         $request_uri;
fastcgi_param  DOCUMENT_URI        $document_uri;
fastcgi_param  DOCUMENT_ROOT       $document_root;
fastcgi_param  SERVER_PROTOCOL     $server_protocol;
fastcgi_param  REMOTE_ADDR         $remote_addr;
fastcgi_param  REMOTE_PORT         $remote_port;
fastcgi_param  SERVER_ADDR         $server_addr;
fastcgi_param  SERVER_PORT         $server_port;
fastcgi_param  SERVER_NAME         $server_name;
(上述配置其实是把请求的变量原封不动的传递给nginx)重启nginx,客户端请求正常:
到此php-fpm已经可以和nginx结合工作
现在我们需要让它可以结合mysql工作:
安装php-mysql:
[root@server nginx]# yum install php-mysql -y
[root@server nginx]# rpm -ql php-mysql
/etc/php.d/mysql.ini
/etc/php.d/mysqli.ini
/etc/php.d/pdo_mysql.ini
/usr/lib64/php/modules/mysql.so
/usr/lib64/php/modules/mysqli.so
/usr/lib64/php/modules/pdo_mysql.so
[root@server nginx]#刷新页面,可以看到php-fpm会默认加载php-mysql配置文件(因为它会扫描/etc/php.d目录下的文件):

此时安装mysql-server:
yum install mysql-server -y启动mysql服务后,测试php是否可以连接mysql
编辑/usr/share/nginx/html,内容如下:
[root@server html]# cat index.php
<?php
    $conn = mysql_connect('127.0.0.1','root','');
    if ($conn)
        echo succ;
    else
        echo fail;
    mysql_close();
?>
[root@server html]#
客户端执行请求:
[root@server html]# curl http://node1.shellscript.cn
succ
[root@server html]#连接正常,此时LNMP运行正常
所以,所谓的动静分离其实把不同的请求分发到不同的服务器或服务器组(upstream servers),可定义多个upstream servers
0.0.4. fastcgi缓存:
同样,需要在nginx.conf的http模块上下文中定义fastcgi_cache_path,然后在default.conf的localtion中使用fastcgi_cache调用
参考:
http://nginx.org/en/docs/http/ngx_http_fastcgi_module.html#fastcgi_cache_path
http://nginx.org/en/docs/http/ngx_http_fastcgi_module.html#fastcgi_cache
- 示例:
在node1节点上的nginx.conf的http上下文定义:
fastcgi_cache_path /cache/fastcgi/ levels=1:1 keys_zone=fcgicache:10m inractive=3m max_size=1g;创建缓存目录并授权:
[root@server nginx]# mkdir /cache/fastcgi
[root@server nginx]# chown nginx.nginx /cache/fastcgi/
[root@server nginx]#编辑conf.d/default.conf:
location ~ \.php$ {
        fastcgi_cache fcgicache;        #调用刚刚定义的缓存
        fastcgi_cache_valid 200 10m;    ##下面这三项指定状态码缓存时间,不指明则不会缓存到
        fastcgi_cache_valid 302 3m;
        fastcgi_cache_valid any 1m;

        root   /usr/share/nginx/html;
        fastcgi_pass   127.0.0.1:9000;
        fastcgi_index  index.php;
        fastcgi_param  SCRIPT_FILENAME  /scripts$fastcgi_script_name;
        include        fastcgi_params;
}在/usr/share/nginx/html下写一个phpinfo的test.php,客户端执行请求:
[root@server nginx]# curl -I http://node1.shellscript.cn/test.php
HTTP/1.1 200 OK
Server: nginx/1.16.0
Date: Tue, 18 Jun 2019 11:09:20 GMT
Content-Type: text/html
Connection: keep-alive
X-Powered-By: PHP/5.3.3
X-Via: 172.30.0.12
X-cache: MISS

[root@server nginx]# curl -I http://node1.shellscript.cn/test.php
HTTP/1.1 200 OK
Server: nginx/1.16.0
Date: Tue, 18 Jun 2019 11:09:21 GMT
Content-Type: text/html
Connection: keep-alive
X-Powered-By: PHP/5.3.3
X-Via: 172.30.0.12
X-cache: HIT

[root@server nginx]#可以看到,第二次请求X-cache参数值是HIT,则说明缓存成功